How to Grow Elderberries
This article is part of our “How to Grow Herbs” series. If you would like to learn more about how to work with this plant after you harvest it, please refer to our Herbal Aromatherapy Certification Program™ here. I also have a full sample lesson about elderberry and elder flower available for you to read here.

When we first moved to the Pacific Northwest, Jon and I set out to explore our local wilderness areas in search of some of the plants I knew grew here. We would drive for hours out in remote areas, keeping our eyes open for plants we recognized. Sometimes we would stop and hike around for a bit, making notes about what we were seeing and where we were. We did not always have a specific plant in mind that we were looking for on those trips but there were a couple of times when we set out specifically to find elder. I knew that it grows wild here but I had not yet come across it and we were on a mission.
The first time we found it growing, we were about an hour from our house out near a lake in the mountains when we came across a majestic elder tree growing right alongside the road. It towered above us, had spread its branches just as wide as it had grown tall, and was covered in massive clusters of flowers the size of big bouquets of cotton candy. Honeybees were everywhere and I was in awe. Though not a good place to harvest, that sweet tree was ingrained in my memory as the first elder I ever met in person.
On later trips in other areas, we found other elder shrubs. A local farmer has a hedgerow of them planted to separate his fields from the road. A cluster of tall blue elders has been planted in a bee and butterfly garden in a nearby town square. The most memorable, though, is a grove of elders we found quite by accident growing on top of a ridge on a mountain in the middle of nowhere. To this day, that area is still my favorite to forage. The roads out there are secluded logging roads, and it is not uncommon to spend an hour without even seeing another car drive by. The biodiversity and peaceful environment are incredible, and it is the kind of beautiful but wild place that feels completely magical but where you must be prepared for anything.
I came to love elder so much I wanted to grow it, so I scoured our local nurseries for plants. At the time, Richo at Strictly Medicinal Seeds did not have the live plants listed in his catalog because he was building up his stock, but I emailed to see when he would have one available. He told me he was about to move a couple of the more mature ones on his property and that I was welcome to purchase one of them. Jon and I rented a little truck (it would not have fit in our car) and took a trip to pick it up, driving home with big, gleeful grins on our faces. I planted her in the garden and called her Granny Elda.
In the years following, I was able to find more bare root elder plants at a local nursery and an online nursery I frequent and planted a few more varieties. I even experimented with some cuttings. The plants in my garden have done quite well and I am always amazed at how quickly they grow!

Growing from Seed
Elder is fairly easy to cultivate, is hardy to USDA zone 4-5, and can be propagated by seed, division, or cuttings.
Elderberry seeds seem to have a higher germination rate when stratified (though I know some herbalists who do not think it is necessary) and can be planted in the fall season when they would naturally fall to the earth. I like to soak them overnight before planting. Expect fresh little elder seedlings to pop through that soil sometime in early spring, if not sooner. If you have had your dried berries or seeds in the fridge for a few weeks, you might find that the seeds come up within a couple weeks.
Once the seedling produces at least one cane with true leaves, you can transplant it out to a protected area in the garden with some BioTone (a product offered by Espoma that helps encourage healthy root growth as a plant is establishing itself). I do not often pot up elderberry because it does not seem to like to be confined, but you could gradually pot seedlings up until they are a little larger if you wish.
Growing from Cuttings
Elderberry is also very easy to grow from cuttings. When I prune the plants, I will often cut the branches into sections and root them to make new plants. To do this, cut a pruned branch into segments by snipping a couple of inches below each set of leaf nodes. Using a pencil or a dowel rod, create a hole in a pot of soil and then stick the cutting down into the hole so that the nodes is well submerged. I have had success doing this with both a terra cotta pot and with a flat tray.

Keep the pot or tray watered through the fall and winter if needed (particularly if you have taken cuttings in the fall) and come spring, you will find that many of the cuttings will have rooted and will start sending up new canes. Once you start to see this, you can plant your new rooted cuttings in the garden, where the plants will quickly mature.


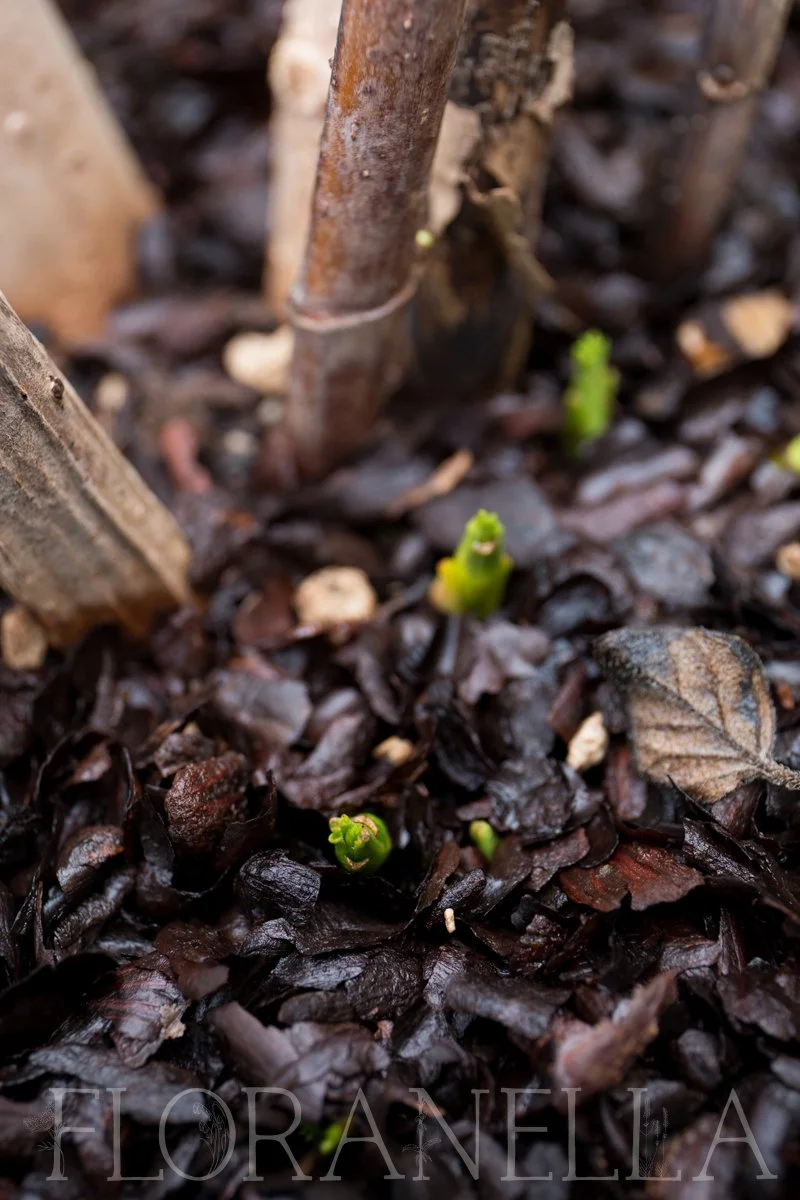
The cuttings will sometimes produce leafy growth on above-ground nodes, but what you are really looking for is new canes coming from the nodes that were below the soil’s surface, as seen in the photo just above this section. I took this picture of some of the cuttings I placed in a pot and then forgot about (Jon remembered to water them, though). When I finally got around to separating them out, it was summertime and their leaves were not looking great, but they are doing very well now! The photo does show you a good example, though, of the new canes emerging from the nodes, as well as new root growth.
The original cutting will usually die back after you transplant your plant into the garden. Look for new canes emerging from the soil the next year before giving up on the new plant.
Growing from Root Divisions
Elderberries also spread underground. Because of this, you will find that many varieties send up new canes each year and sometimes, they can be quite spready. You can divide these new canes from the mother plant and transplant them elsewhere to create a new plant.

Growing Conditions
Elderberries will grow both in full sun and in partial sun / shade. The plants can thrive in almost any kind of soil but they do like moisture. Keeping them evenly watered (but not letting them sit in saturated soil that doesn’t drain) seems to contribute to plant health. The plants also seem to do well when top-dressed each spring with a fresh layer of compost and mulch.
Pruning and Harvesting
Each year, elderberry plants will continue to flower and fruit on existing canes and will send up new canes from the soil. You can prune out old canes as they die off or slow their production. Usually, a cane’s first year is its least productive. Its second year is more impressive, and its third and fourth years start to taper off in productivity.
Many people recommend harvesting the flower clusters off the plants the first year you plant them rather than allowing the plants to set fruit. This allows the plant to spend its first year focusing on establishing healthy root growth. I have tried this and have also tried allowing the plants to fruit the first year and have not noticed much difference in plant health either way, so it really comes down to your own preference and which method resonates with you.
Harvest black elderberries when they are entirely dark purple, with no green or red berries remaining on the cluster. If you need to harvest your berries before the birds get to them, wait as long as you can before harvesting, then use only the fully ripe berries from the cluster in your remedy making / preserving.
Blue elderberries are ripe when they are a saturated blue color with a powdery-looking yeasty coating (you can rub the coating off with your finger to see the color of the berry underneath) and when the berries have a bit of give to them as a ripe plum or blueberry would.

Learning More
If you would like to learn more about how to work with aromatic plants, I hope you will join me in our Herbal Aromatherapy Certification Program™ here at Floranella! In it, I teach students how to safely and effectively work with over 100 different herbs as well as their applicable essential oils and hydrosols from the garden to the still to the apothecary. . I even have a full lesson on elderberries available in our sample lessons area if you would like to learn more about elderberry first. You can find that lesson here. I hope to see you in class one day!

About the Author
Hi there, I’m Erin! I am the main instructor here at Floranella. I am a clinical herbalist, aromatherapist, artisan distiller and organic gardener based in the Pacific Northwest. Here at Floranella, I teach people how to work with plants safely and effectively from the garden to the apothecary. Thanks for being here! I’m glad you stopped by.
